We understand that many of our authors are new to the publishing business. We do our best to offer self-publishing help along the way, but sometimes they misunderstand how our process works. The best way to avoid possible errors is to educate our clients whenever possible. Whether you choose us or another book printer, do yourself a big favor and learn our three things that are commonly misunderstood. There are hundreds of things that can go wrong with a custom book printing order, but these three items probably cover 90% of them.
1. We print your books according to your instructions, using your files.
2. Never GUESS or ASSUME anything regarding your book order.
3. Our PrePress rules must be followed.
And here is our regular FAQ section. Simply toggle through the questions below, clicking on the "+" before each question to reveal its answer. If you can't find the answers you're looking for about online book printing or publishing a book yourself, just call us (800-231-0521), email us, or use our On-Line Chat.
Yes, we do. You can download templates for free from our Templates Page. We currently have templates for your inside pages, which can be used in Microsoft Word, Word Perfect, Open Office, Pages, and just about any other popular word processing program. We also have free book cover templates available for Adobe inDesign. We also provide PDF cover templates that can be opened and used Photoshop and other design programs, or simply used as a reference for how to set up your cover.
In Windows, using Word 2007 or newer: Many of our clients use Microsoft Word to write their books. If you're using a recent version of Word (2007 or newer), the easiest way to create a PDF file is to click "File > Save As ..." and select "PDF File" as your file type. Click on the "Options" button, and check the box that says something like "ISO 19005-1 compliant (PDF/A)". This should embed all fonts. Double-check by opening the PDF file, select File > Properties, click on the 'Fonts' tab, and make sure each font listed says "Embedded" or "Embedded Subset" after its name. If any fonts don't say that, they weren't embedded. It may be that you don't have permission to embed them. They may still print OK, so send the PDF to us, and we'll check it for you.
In Windows, using an older version of Word or a different program: You can convert your files to PDF for FREE by using a great new converter called doPDF. Simply click here to download doPDF and select "Run" when prompted. This installs a virtual printer named "doPDF" on your computer. With it, you'll be able to "File > Print ..." to create a PDF from any Windows application. Then choose "doPDF" as your printer. The first time you use doPDF, hit the 'Preferences' button and change 'Graphic Resolution' to 600 dpi (near the bottom right of the window.) Hit 'OK' and your Preferences are all set. Hit 'Print', make sure 'Embed fonts' is turned ON, and it will create a PDF.
From a Mac: PDF conversion is built right into your system. To create a PDF file on a Mac, simply open your file, select "File > Print", then click the "PDF" button at the bottom left and choose "Save as PDF ...".
Be sure to check your PDF file CAREFULLY before sending it to us for printing. Any errors on your PDF will show up on all of your books. If you have questions, call us for help, or just send us your Word files and we'll convert them for you for a $50 charge.
If you don't want to use our calculators above, here are basic instructions that work for Perfect Bound book covers:
Make your cover slightly larger than the book itself, to account for bleed (when the printing goes all the way to the edge). Since it's a wrap-around cover, it needs to be TWICE the width of the finished book, plus the spine. To determine the width of your spine, divide number of Pages (not SHEETS, but PAGES) by 440. For example, if your book was 120 pages, the spine would be 120 / 440 = 0.27 inches.
So, for a 5.5 x 8.5 book that is 120 pages long, the cover should be 8.5 tall, and 11.27 wide (5.5 front + 5.5 back + .27 spine = 11.27). And for a 8.5 x 11 book that is 200 pages long, the cover should be 11 tall, and 17.45 wide (8.5 front + 8.5 back + .45 spine = 17.45). Of course, if your artwork is going to BLEED (go all the way to the edge), you'll need to have it extend 1/8" BEYOND the edges on top, bottom and sides. Include your title and author name on the spine so when your book is on a bookshelf, the title and author name read from top to bottom.
For Coil Bound books or Saddle-Stitched booklets, since there is no spine, simply send us a front cover and a back cover, the same size as your book pages. Remember to include a 1/8" bleed if your artwork is intended to bleed off the edges.
Please Note: We do NOT print on the inside cover. No printing on the inside front cover or back cover. Under special circumstances, we can print on the inside cover, but there is an additional cost and time involved. Please call to discuss.
To change your book size in Microsoft Word, click the Page Layout header. From here, either select the proper size from the list or simply type in the proper width and height. Next, type the proper margins. We recommend 0.75" of margin on all four sides. This ensures that none of the text runs too close to the edge of your final book.
After opening Microsoft Publisher, select the "Blank Page Sizes" option and choose the size that you would like your finished book to be. Next, on the left-hand column, select "Change Paper Size ...". From here, you can adjust the page size as well as the margin guides. We recommend 0.75" of margin on all four sides. This ensures that none of the text runs too close to the edge of your final book.
To change your book size in InDesign, select "File > Document Setup ..." and adjust the width and height to be the size that you would like your finished book to be. Next, select "Layout > Margins and Columns ..." and adjust your page margins. We recommend 0.75" of margin on all four sides. This ensures that none of the text runs too close to the edge of your final book.
Yes, we do. While our covers are always printed full-color, the inside pages are usually printed black-and-white. However, we also offer full-color books, as well as "combination" books (books with some black-and-white pages and some full-color pages). Pricing for all of these is available on the Cost Calculator which can be found on the Price Calculator tab.
Yes. As long as you order a minimum of 10 books of each binding type, we offer the option to "convert" some books on a single order to a different binding type. If you are converting from paperback to hardcover, the additional cost is $10 per book. When printing two different binding types on the same order, the interior files must be exactly the same for both binding types -- the covers can be different. If you'd like additional options or if you require different interior pages for each binding type, you must place two separate orders. Call us if you have any questions!
Note: "Converting" books does not add additional books to your order.
Example: if you order 50 paperback books and tell us to convert 10 of them to hardcover, you'll receive 40 paperback books and 10 hardcover books. This would cost an additional $100.
**Ongoing special** Convert 25 books to hardcover for $210 (regular price $250)!
Yes, if you already have an ISBN, we can create the barcode for you. We can also include the price for the book in the barcode if you'd like us to. Simply type the ISBN number and the price in the "Comments" section when you place your order. It costs $20, which we will add to your order.
We're the only book printers who can provide self-publishers with Foil Stamped covers! We offer two different Foil Stamping Services.
For most orders, Foil Stamping is done with our exclusive Diamond 3D Foil. This is a raised metallic foil coating that can be used to highlight elements of your book cover (most often your book title) to really catch the eye. Currently available in gold, silver, red, or blue. Note: Diamond 3-D Covers add three days to production time.
Book Size | Setup | (@ 40% off) | Add'l per book | (@ 40% off) |
---|---|---|---|---|
5.5x8.5 inches and smaller | $150 | $90 | 90¢ | 54¢ |
Larger than 5.5x8.5 inches | $150 | $90 | $1.50 | 90¢ |
For hard cover books with leather or cloth covers, we offer traditional Foil Stamping, which is hot stamped with a custom copper die. The pricing is based on the size of the die we need to order. To estimate the size of YOUR die, draw an imaginary rectangle around the area to be foil stamped. Multiply WIDTH x HEIGHT. For example, a rectangle that is 5" wide and 3" tall would be 5 x 3 = 15 square inches. So if your rectangle is less than 27 square inches, it would be SMALL. If it's between 27 and 54 square inches, it would be MEDIUM.
Die Size | Setup | Add'l per book |
---|---|---|
SMALL - Die up to 27 square inches | $250 set-up + | 35¢ per book |
MEDIUM - Die between 27 and 54 square inches | $300 set-up + | 40¢ per book |
LARGE - Die between 54 and 81 square inches | $350 set-up + | 50¢ per book |
EXTRA LARGE - Die larger than 81 square inches | $600 set-up + | 75¢ per book |
There are some limitations to what can be foil stamped, so you should send us your artwork to make sure it can be done. Note: Foil Stamping adds three days to production time.
Yes, we do offer lay-flat lamination. All of our hardcover books are laminated, and for perfect bound (paperback) books, it is an option. However, please keep this in mind: all lamination will curl. "Lay-flat" simply means it curls less than standard lamination. With laminated covers, you have two different substances: a PAPER cover glued to a NYLON laminate. When they are exposed to any change in climate (temperature or humidity change), the two substances will expand and contract differently, causing the cover to curl. We use materials that are designed to minimize curl, but it can't be eliminated entirely. Our standard UV coating is embedded into the paper, and therefore curls less than the lay-flat lamination. The drawback, of course, is that it doesn't provide the protection and durability that a laminated cover does. For hardcover books (case bound), because the cover is wrapped around a cover board and glued down with end-sheets, there are no curling issues, so lay-flat lamination is standard. It provides a sturdy, durable finish.
Yes, we can print photos. Black-and-white photos on the inside, and full-color photos on the cover are FREE. If you want full-color photos on the inside, just indicate how many pages of full-color you'd like when you fill out your order.
Since your books are printed digitally, black-and-white photos on the inside pages will be printed as halftones at 106 lpi. Full-color photos are printed as continuous tones and are near photographic quality.
Yes, we can help you to format your files. We can offer you free simple instructions for reformatting your own files, or you can simply send us your files (Word documents) and we can reformat them for you. For most standard book files, the reformatting charge is $125. If you have special requirements (large files, many graphics or charts, etc.), we'll analyze your files for free and let you know up front what the reformatting cost will be.
We send a FREE PDF proof for your approval, but if you also want a PRINTED PROOF sent to you via UPS Next Day Air, respond "Yes" to Printed Proof when you place your order. You'll still get the PDF proof, but after you approve that, we'll print, bind, and ship a printed proof to you. We pay the shipping. All you pay is $40 for the proof itself. This $40 price is a special price for the first printed proof. Additional printed proofs may be more expensive, based on your book specifications.
Yes, we offer an economical alternative to the high-priced cover design you've seen elsewhere.
Our 'Economy' Create-a-Cover gives you a professional-looking book cover for a fraction of the cost. We have several templates for you to look at. Simply choose a template that you like, choose a color combination, and then send us any elements (photos, graphics, and type). We'll put them all together according to your instructions, and send you a PDF Proof. We even include one set of changes or corrections for free. At a cost of $100, it's a great alternative to getting a high-priced custom cover design elsewhere.
Our 'Custom' Cover Design (starting at $500) is a little more elaborate. One of our Graphic Designers will give you a call to discuss your book cover. We'll get your input, then create a couple of rough drafts of covers. Simply let us know what you like or dislike about each of the rough drafts. We'll make whatever changes you need, and come up with a Cover Design that's you'll be happy with.
If you have more complex requirements, we recommend that you contact a local graphic designer, since you'll probably want to meet with them in person to discuss your requirements.
Yes, we can convert your files to PDF for you, however, it's best if you do it yourself. Opening Word documents on different computers sometimes causes the formatting to shift, and the final PDF won't come out looking how you expect it to. If any formatting work is needed, there is an additional reformatting fee of $75.
In Windows, using Word 2007 or newer: Many of our clients use Microsoft Word to write their books. If you're using a recent version of Word (2007 or newer), the easiest way to create a PDF file is to click "File > Save As ..." and select "PDF File" as your file type.
In Windows, using an older version of Word or a different program: You can convert your files to PDF for FREE by using a great new converter called doPDF. Simply click here to download doPDF and select "Run" when prompted. This installs a virtual printer named &qout;doPDF" on your computer. With it, you'll be able to "File > Print ..." to create a PDF from any Windows application. Then choose "doPDF" as your printer. The first time you use doPDF, hit the 'Preferences' button and change 'Graphic Resolution' to 600 dpi (near the bottom right of the window.)Hit 'OK' and your Preferences are all set. Hit 'Print', make sure 'Embed fonts' is turned ON, and it will create a PDF.
From a Mac: PDF conversion is built right into your system. To create a PDF file on a Mac, simply open your file, select "File > Print", then click the "PDF" button at the bottom left and choose "Save as PDF ...".
Be sure to check your PDF file CAREFULLY before sending it to us for printing. Any errors on your PDF will show up on all of your books. If you have questions, call us for help, or just send us your Word files and we'll convert them for you for a $50 charge.
We've got a complete prepress department, staffed with qualified graphic designers. Depending on the type of files that you send us, we can take care of most corrections or deletions. Any corrections or modifications may incur extra fees -- just let us know what you have in mind and we can provide you with a quote for the work ahead of time.
Yes, we can print index tabs in your books. We recommend that you only use tabs for spiral bound books, but we MAY be able to put them into perfect bound and hardcover books as well. For coil bound books:
For Perfect Bound and Hard Cover books, tabs are a little trickier. We recommend that you call or email us the information, and we'll let you know if it can be done, and what the cost would be. If you have questions, just call or email us. We'll be happy to help.
When we talk about resolution, we're referring to the dots per inch (dpi) of the graphics. A higher dpi means a higher quality image—so if something is low resolution, that means it has a low dpi and may print blurry. Especially if you’re searching online for an image, it’s important to check the dpi or the dimensions in pixels if they are noted. To get the best quality, you’ll want to make sure the images you use are at least 300 dpi at the finished size. See the FAQs above for instructions on how to determine the dimensions of an image. If you're scanning images, make sure your scanner is set to a resolution of at least 300 dpi and that you're not enlarging the image too much from its original size.
If you can’t determine the dpi or can’t get a version of the image that is at least 300 dpi, you’re not out of options. While we recommend 300 dpi, it’s often true that 200 dpi is good enough.
Here’s an example. Let's say we have an image that is 240 pixels wide x 160 pixels tall. The width in pixels divided by our desired resolution (dpi) will give us the maximum width in inches before the image becomes low resolution.
(Pixels ÷ Desired dpi = Maximum Size in Inches).
So, we take the 240 pixel width and divide this by the 200 dpi quality we’d like, which gives us 1.2 inches (240 ÷ 200 = 1.2). This means the photo will be blurry or low resolution if it’s larger than 1.2 inches. But at 1.2 inches wide, it’s acceptable quality and ready to print.
We know what you’re thinking: 1.2 inches is way too small. If you need an image to be a specific size, you can find out what resolution it will be at that size by using a formula similar to the one above. The width in pixels divided by the desired width in inches will give you the resolution at that size.
(Pixels ÷ Inches= dpi).
So, let's say we want this image to be 4 inches wide to be centered on the front cover of our book. We take the 240 pixel width and divide this by the 4 inch width we want, which gives us a dpi of only 60 (240 ÷ 4 = 60). This means if we're enlarging the image to 4 inches it will look pretty blurry when printed (and even looks blurry on screen):
If you have access to a larger or higher resolution version of an image, you have a better chance of getting it to look the way you want. Unfortunately there’s just not a way to improve the quality of an image if it’s low resolution to begin with. Luckily, our photographer was able to send us a version of the same image that is 800 x 533 pixels.
800 pixels divided by 200 dpi (the lowest dpi we want before we risk losing quality) = 4 inches (800 ÷ 200 = 4). This means we can make the image 4 inches wide or smaller and it will be good quality when printed, though not perfect.
We're much happier with the way this image looks, even though it’s still not the recommended 300 dpi.
If we wanted to ensure beyond all doubt that the picture would print perfectly without having to re-size it, we’d need to find a version of the image that was at least 1200 pixels wide. (If you’re catching on, you’ll know that we found this by multiplying our desired 4 inch width by our desired 300 dpi resolution (4 x 300 = 1200)).
Here are those formulas again:
Pixels ÷ dpi = Maximum Size in Inches
Pixels ÷ Inches = dpi
Inches x dpi = Width in Pixels Needed
Crunching the numbers and trying to figure out image resolution can be a real headache, but it’s an important step in getting your book to look the way you want. High resolution images make your book look much more professional, and it’s worth the extra time and effort to get a great looking final product!
We don't require you to use high resolution graphics, but we do recommend it. We want you to be happy with your final product, so we send you a warning when we find something that may not print perfectly. We won't hold up your order and will continue working on your files as they are unless we hear from you. When previewing your PDF files, zoom in to about 200% of the original size. This will give you an idea of how images or text may look when printed. If you’re OK with the way everything looks at 200%, chances are you’ll be happy with the way it prints. (Of course, the only way to be sure you're happy with the quality is to order a printed proof with your order—we highly recommend this).
Sometimes graphics lose quality when you’re creating a PDF file, so the first thing you'll want to double check is the quality of your graphics in your original document. If everything looks good in your original document, take a look at how you are saving the file.
The settings to avoid losing quality vary depending on which program you’re using to create your book. As long as your image was high quality to begin with, you’ll be able to create a PDF without losing any quality; it may just take some experimenting to get the options right. A good rule of thumb when saving as a PDF is to check every “options” or “properties” window that appears when saving to make sure nothing is compressing the file. (“Print” quality is always better than “Web” quality and a larger file is usually better than a smaller file)!
PLEASE NOTE: Even though the program allows you to do it, going into Photoshop and simply changing the dpi of an existing image to 300 will NOT improve the way your image prints. We wish it were that easy!
Your settings may not look exactly the same as the examples shown here, but they should be similar. Use the links below for instructions for specific programs.
…these settings will only help you from LOSING image quality—they can’t give you quality that wasn’t there to begin with. If you need help determining the resolution of your original images (or improving it), you can find more information about that below.
You can find out the resolution of your image by opening it in a photo editing program such as Adobe Photoshop or by using the methods below:
You can also find the dimensions and resolution on a Windows computer by right-clicking on the file and selecting "Properties." The properties window will open. Select the "Details" tab along the top of the window.
This is where you’ll find all of the info you’ll need about the image, including the dimensions and the dpi.
On a Mac, you can right-click on the file and select Get Info.
A window will pop up with information about the image including its dimensions in pixels.
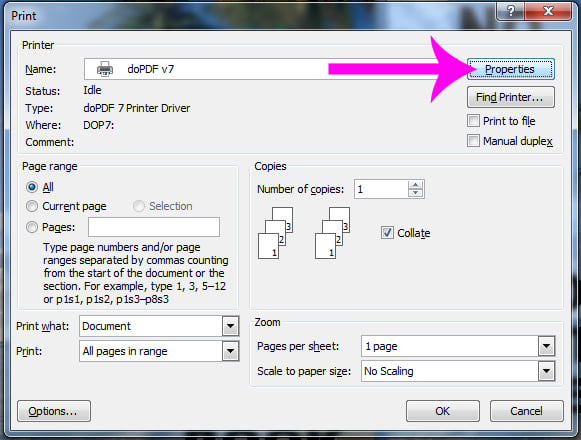
We recommend using the free PDF converter called "doPDF" (available here) if you are using a Windows computer. Once you have the converter installed on your computer, go to File > Print. Make sure you choose "doPDF v7" as your printer, and then click on the "Properties" button.
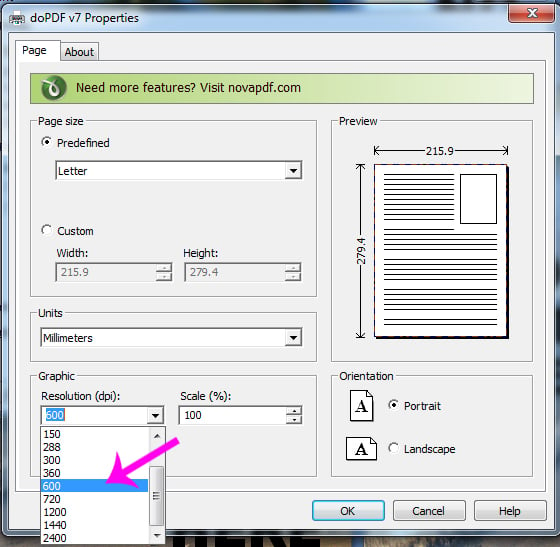
Another window will open up and in the bottom left corner you will see a drop-down menu labeled "Graphic resolution (dpi)." Change the resolution to 600 dpi and hit "Ok." Then, press the "Print" button.
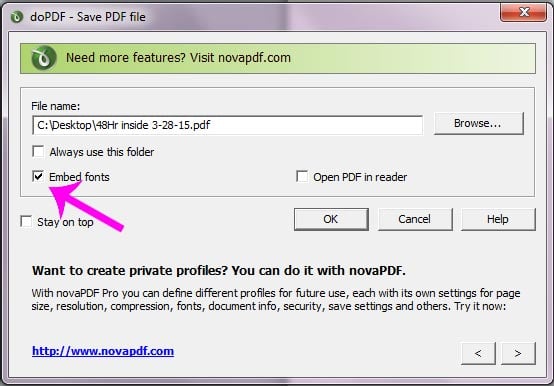
Very Important >> In the next window, be sure the box for "Embed fonts" is checked. You'll also want to pay attention to where you are saving this PDF file. It's usually easiest to save it to the Desktop, and give it a unique name like "48Hr inside" with today's date. This way, it won't get confused with previous versions.
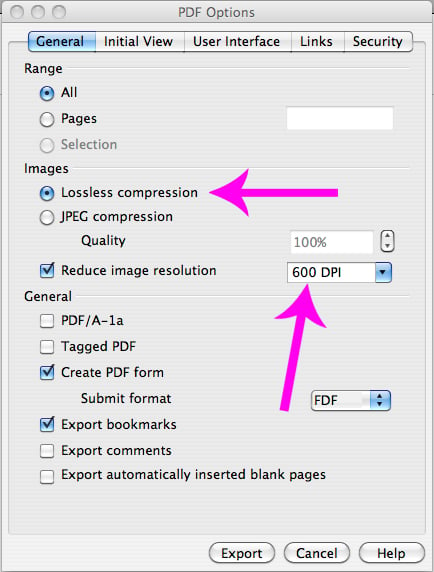
If you decide not to use doPDF, you may be able to select "File > Save as PDF." If so, you should see the option here:
Be sure to select "Optimize for Standard Printing and Publishing" and make sure that "Minimum size" is NOT selected.
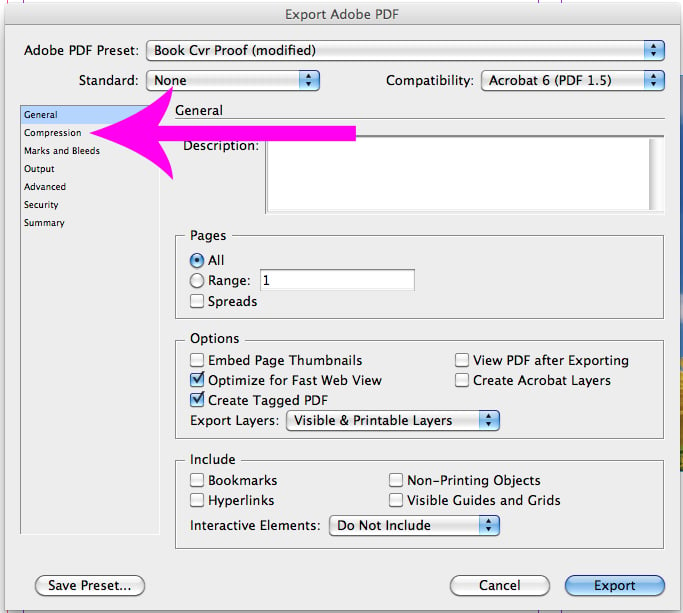
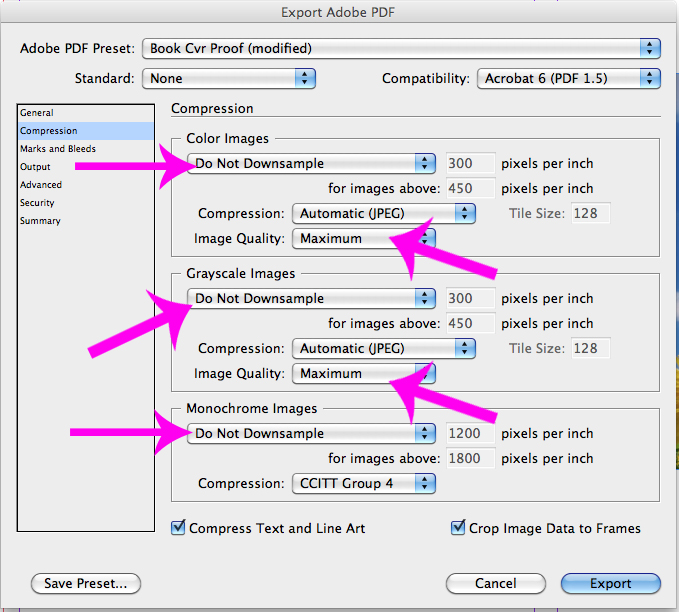
Go to File > Export and choose "Adobe PDF (Print)." Choose a location on your computer to save the file and click "save." Another window should pop up that looks like this:
You can choose a preset* at the top in the drop-down menu if you'd like (usually "Press Quality" is good enough). If you'd like to adjust the settings on your own, go to the "Compression" options on the left-hand side, make sure all elements are set to "Do not downsample" and "Maximum" quality. Then, click "Export."
*If you choose a preset, be sure to check all of the settings to make sure they are correct for your book. For example, if you have bleeds built in to your file, go under "Marks and Bleeds" on the left-hand side and make sure "Use Document Bleed Settings" is checked.
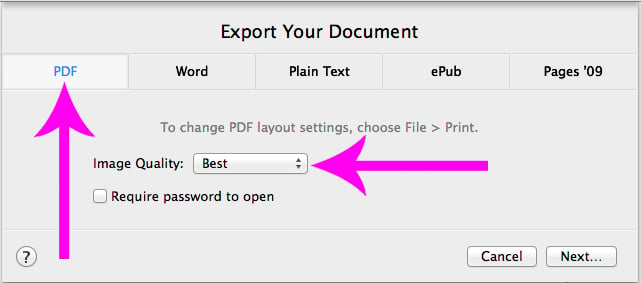
Go to File > Export to > PDF. A window will pop up with some options. Make sure "PDF" is selected in the top left corner, and under "Image Quality" use the drop-down menu to make sure "Best" is selected.
Then click "Next," choose a location on your computer to save the file, and click "Export."
There are settings within Acrobat Distiller that determine how much to "downsample" your file to a lower resolution. While handy for web graphics, this can be horrible for printed material. Either use one of Adobe's pre-set settings ("Print" or "Press" work fine), or change the settings yourself within Distiller.
Go to the "Settings" menu at the top and select "Edit Adobe PDF settings." A window will pop up. Under the "General" tab, make sure the resolution is set to at least 600 dpi.
Then, click on the "Images" tab at the top of this same window and check all of the settings. Make sure the "downsample" is set to no lower than 300 dpi for color and grayscale images and no lower than 600 dpi for monochrome images (line art). Then hit "OK."
In general, the "per book" price drops as you order more books.
Select the next larger size from our list of book sizes, then write the ACTUAL book size in the COMMENTS section of the order form. For example, a 5"x7" book would be priced like a 5.5" x 8.5" book, and a 7"x10" book would be priced like an 8.5"x11" book.
There's a big difference between "pages" and "sheets." The front and back of a SHEET count as two PAGES. If you've got 60 sheets 2-sided, that equals 120 pages, so make sure you enter "120." Just about all computer programs will tell you how many pages are in your file, but if we are going to reformat your files, the final number of pages in your book may change. In that case, just enter your best guess at the number of pages and we'll let you know exactly how many there are after it's been reformatted.
Each order we receive is assigned a graphic designer who performs any necessary prepress work. Even if your files are "print-ready," our techs do a number of things to make sure everything will print correctly. We'll check to make sure fonts are embedded, page size is correct, margins aren't too narrow, bleed is set up if necessary, images are high resolution, the cover will fit, and more!
We sometimes make the following adjustments to your file(s):
(a) reduce or enlarge your file to fit the page size you selected,
(b) add or remove blank pages where we think it is helpful,
(c) adjust your margins,
(d) add or change your page numbering or
e) move elements on your cover art slightly.
We will NOT perform editing work such as spelling, grammar, or typo corrections.
Please review your PDF proofs carefully. If you're not sure about something, send us a note or give us a call!
When you are finished proofreading, log into your 48HrBooks account and either “Approve” or “Reject” your proofs. Even though the cover and inside pages are separate files, you’ll only approve if BOTH proofs look correct. Please remember, once you sign off, your books go into print immediately. You won’t be able to make any more changes.
To make corrections or send new files, REJECT your proofs - you won't hurt our feelings! We want your books to be perfect. After rejecting your proof, all corrections must be submitted in writing and sent in a single email or order note. If they are OUR mistakes, we will correct them for free. If they are YOUR mistakes, we may be able to make minor corrections and save you the $50 cost of sending revised files. If we can’t, we’ll tell you what we need.
Please do not directly edit the proof files we send you - we won't be able to print them!
The best way to keep your costs low is to proofread carefully at every step. Your costs start to increase if we have to go back and forth with multiple revisions of your files. Try to give us trouble-free "ready-to-print" files from the beginning. (If you've never formatted a book before, we do offer formatting services.) Next, make absolutely sure that the PDF proof that you approve is correct. We give you this proof so that you have an opportunity to find errors, yours and ours, BEFORE the books are printed. If there are errors that go undetected in the proofreading, we cannot reprint your books for free. The best we'll be able to do is make the corrections to your files so they are right for the next printing.
"Rush" and "SuperRush" production options are available.
"Standard" service for perfect bound books or saddle stitched books means we ship your books 2 business days after your artwork approval. For hard cover or coil bound books, we ship your books 5 business days after your artwork approval.
"Rush" service decreases production time by one day. "SuperRush" service decreases production time by two days. This means for perfect bound books, we can ship your books the same day -- as long as your artwork is approved before noon EST (and you'll need to confirm that SuperRush is still available for that day).
For hard cover and coil bound books, we can ship your books as soon as 3 days after your artwork approval.You'll be able to select your production speed when placing your order. If there's a particular date that you need your books, please be sure to notify our customer service team as soon as possible. We'll keep an eye on your order to make sure (1) that it's possible to meet your "need-by" date and (2) that you approve proofs and pay on time. We'll also help determine the least expensive upgrading options if needed.
The short answer is: It's definitely possible, but there are a few things you'll need to keep in mind:
The "48 Hour Clock" starts ticking after you approve proofs supplied by 48 Hr Books and pay for your order in full. It is 48 Hr Books' policy to provide PDF (digital) proofs for review, and printed proofs are available as an additional option. PDF proofs are typically available within 24 hours of placing your order; however, all files are different. Depending on the amount of work required to set up your files, it may take longer to receive a PDF proof. If you have a "need by" date or event scheduled, please notify our customer service team immediately. We'll keep a close eye on the timing of your order, make sure you're on track along the way, and offer the least expensive upgrade options if needed. Once your order is approved and paid in full, use the cheat sheets below to determine when your books would ship.
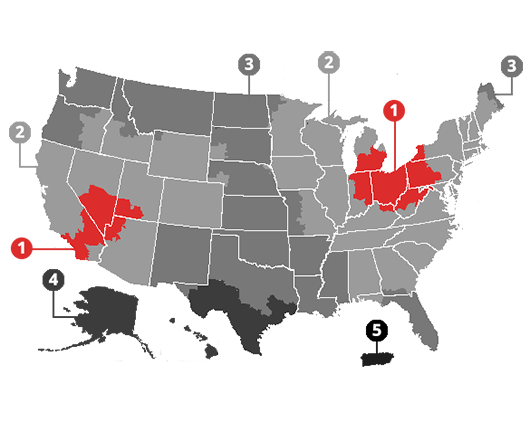
For example, if you OK your Perfect Bound books by 5pm EST on Monday, we'll ship your books on Wednesday. You'll need to add SHIPPING TIME to this. See the map below for your online self-publishing shipment times.
Proof OK'ed before cutoff on... | Standard (cut-off is 5pm EST), Books Ship... | Rush (cut-off is 3pm EST), Books Ship... | SuperRush (cut-off is 12pm EST), Books Ship... |
---|---|---|---|
Monday | Wednesday | Tuesday * | Monday * |
Tuesday | Thursday | Wednesday * | Tuesday * |
Wednesday | Friday | Thursday * | Wednesday * |
Thursday | Monday | Friday * | Thursday * |
Friday | Tuesday | Monday * | Friday * |
Saturday, Sunday | Wednesday | Tuesday * | Monday * |
* = Please CALL US for Rush or SuperRush book printing. They are only available on a limited basis. Also, you'll need to give us enough time to get a PDF Proof back to you so that you can approve it by 3pm EST for Rushes, and by noon EST for SuperRushes.
Hard cover and Coil Binding take a little longer. They have a standard 5-day PRODUCTION TIME. And you'll still need to add SHIPPING TIME to that. For example, if you OK your hard cover or coil bound books by 5pm EST on Monday, we'll ship your books on the following Monday. See the map below for your shipping time.
Proof OK'ed before cutoff on... | Standard (cut-off is 5pm EST), Books Ship... | Rush (cut-off is 3pm EST), Books Ship... | SuperRush (cut-off is 12pm EST), Books Ship... |
---|---|---|---|
Proof OK'ed before cut-off on... |
Standard (cut-off is 5pm EST), Books Ship... |
Rush (cut-off is 3pm EST), Books Ship... |
SuperRush (cut-off is noon EST), Books Ship... |
Monday | Monday | Friday * | Thursday * |
Tuesday | Tuesday | Monday * | Friday * |
Wednesday | Wednesday | Tuesday * | Monday * |
Thursday | Thursday | Wednesday * | Tuesday * |
Friday | Friday | Thursday * | Wednesday * |
Saturday, Sunday | Monday | Friday * | Thursday * |
* = Please CALL US for Rush or SuperRush book printing. They are only available on a limited basis. Also, you'll need to give us enough time to get a PDF Proof back to you so that you can approve it by 3pm EST for Rushes, and by noon EST for SuperRushes.
Use the UPS map below to determine how many business days it will take to receive your order after it ships from our facility. Keep in mind that UPS does not count Saturday or Sunday as transit days. Expedited shipping (Next Day Air, 2nd Day Air) is also available.
You'll be able to select expedited UPS shipping (Next Day Air, 2nd Day Air, etc.) when you place your order.
Yes, we do this all the time! Even if you need your books tomorrow, we can probably get it done for you. Just select "SuperRush" and Next Day Air, then get us the files early enough that you'll be able to sign off on your PDF Proof before noon EST. But if you're choosing "SuperRush", be sure to call us to confirm that we've got production time available that day.
In addition to faster Rush and Super Rush production times, we can also expedite your shipping. All orders are shipped from one of 48 Hr Books’ two production facilities — from Akron, Ohio or Las Vegas, Nevada. It is up to 48 Hr Books’ discretion to determine the appropriate production facility for each order. Check out the UPS shipping map below to see how long UPS Ground will take to get to you. If you need your books faster than that, you may want to select Next Day Air, 2nd Day Air, or 3 Day Select as your shipping method. However, it's usually less expensive to upgrade the PRODUCTION time (Rush or Super Rush) than to upgrade the SHIPPING. We can help make sure that your books get delivered on time. Just give us a call, but be sure to do it BEFORE you give final approval of your artwork.
Yes, we can split ship. We can ship to up to 4 different locations for each order!
Example: suppose you order 200 books, but want 50 to go to New York and the rest to go to California. No problem. Just let us know exactly how many go to each address, and we'll take care of the rest. You'll be asked to designate one address as the "priority" address. Don't worry -- all of your shipments are a priority! Our customer service team will simply use the priority address to help determine the best methods to upgrade the order if needed to meet a specific deadline.
48 Hr Books uses UPS to ship all orders with the exception of shipments to Alaska, Hawaii, and Puerto Rico, which are sent via USPS Priority Mail. If you’d like to use a different shipping service, you're welcome to make alternate arrangements -- we'll provide you with the ship date, number of boxes, and weight once the order is approved for printing (we can estimate these beforehand if needed).
All books are shrink-wrapped in groups (typically 5-10 books, depending on the thickness of your book) and packaged in boxes that exceed UPS's recommended guidelines. Individual shrink wrapping is available for an extra fee, and may delay your ship date.
Contact our customer service team for more information!
Yes, blind shipping is available, and we don't charge extra for it. Blind shipments are sent in plain brown boxes, without our name appearing anywhere. Your company is listed as the shipper.
We ONLY ship to USA and Canada. We like to follow through on all of our orders, and a shipment to other countries can be difficult to track, expensive to ship, and hard to guarantee by a certain date. If you need your books shipped to a different country, we recommend that you coordinate a pickup of your books at our offices with your preferred carrier (UPS, FedEx, DHL, Post Office, etc.). We'll print, bind, package, and have your books ready for pickup.
If you want your cover artwork to extend all the way to the edge of the cover (so it "bleeds" off the cover), you'll need to extend that artwork BEYOND the edge of the cover at least 1/8". Some programs will create a bleed for you, but if you're not sure how to do it, simply create a page size that is 1/4" wider (1/8" added to the right, and 1/8" added to the left), and 1/4" taller (1/8" added to the top, and 1/8" added to the bottom), and make sure you keep any TYPE at least 3/8" away from the edges for your cover files, and at least 3/4" away from the edges for inside pages.
Since all of our books are custom orders, we do not accept returns unless there are manufacturing defects or damages in shipping.
On the rare occasion that there is a defect in the manufacturing process or damage in shipping, please call or email us immediately and let us know what's wrong. We'll reprint the affected books and send them out to you at no additional charge. All claims of defects in manufacturing or damages in shipping must be made within 30 calendar days of receipt of your order. So please, open your shipment and examine your books when they arrive.
If no such claim is made, 48 Hr Books and the customer will understand that the job has been accepted. By accepting the job, the customer acknowledges that 48 Hr Books's performance has fully satisfied all terms, conditions, and specifications. 48 Hr Books's Liability will be limited to the quoted printing and binding price of defective goods without additional charge for special or consequential damages.
Our terms involve a $100 deposit before we start working on your files, and payment in full before we start printing. We accept Paypal and all major credit cards. We require a $100 deposit for all orders, after which we will begin working on your files and creating your PDF proof. You can make additional payments by logging onto your account, selecting your current order, and clicking the "Add Payment" button on the right side. All orders must be paid in full before we can begin to print your books. If you choose to pay by check, simply select "Other" as form of payment when you place your order. Then make your check payable to "48 Hr Books" and send it to:
Please note that paying by check (including Paypal's E-Check) will delay your order by several days, since we wait for your check to clear before we begin printing. If you've got a PayPal account, why not use their "Bill Me Later" feature?
Click here for a sampling of the hundreds of complimentary notes we get from our satisfied customers.